
Sometime last year, I ran across a post on Twitter talking about this thing called a Pi-Hole which could be used as a secure DNS server, automatically blocking adware and — potentially — malicious traffic. I remember thinking to myself oh, that’s cool, and I even went to text a screencap of the post to a friend out of state, but then I promptly forgot about it for 4 or 5 months.
Fast forward to January of this year. I was looking for a new project to work on anyway and somehow, fortuitously for me, my ongoing text conversation with that friend somehow turned back to securing network services like DNS and I remembered the Pi-Hole. Being as how I had cash on hand at the time, I ordered myself a Raspberry Pi and began waiting next to the front door like a kid on Christmas Eve.
For the record, below is what I ordered from PiShop.us:
And, because I rather shortsightedly did not think about the fact that I didn’t already have a MicroSD card reader, below is what I ordered from Amazon:
The lesson here, of course, is to always make sure you have the right tools for the job the first time around.
Putting it Together
Assembling the Pi itself was fairly intuitive, even for a first timer. I lined up the ports on the motherboard with the cutouts in the case, snapped the motherboard in, and voila. After that I did do a quick Google image search to be sure that I was installing the heat sinks in the correct spots and that was that.
A little less intuitive was the process for getting the Raspbian OS installed onto the MicroSD card, but fortunately another quick Google search led me to this article on the official Raspberry Pi Foundation’s website about installing an operating system image.
Basically:
- Download an image from the Downloads page
- Decompress the ZIP file with 7-Zip or something similar
- Download and install Etcher (Raspberry’s recommended software)
- Use Etcher to write the Raspbian image to the MicroSD card
- Install the MicroSD card in the Raspberry Pi
At this point, you now have a brand new, functional Raspberry Pi. To be honest you can buy these things with a MicroSD card already imaged with Raspbian on it, but that takes part of the fun out of it for me personally. Your call.
Installing and Configuring Pi-Hole
By this time in my Google searching, I had already (of course) found the official documentation from the Pi-Hole project on how to install it, but even more critically I had also stumbled across this post by the one and only Troy Hunt about how he had followed instructions from Scott Helme on how to set up Pi-Hole over HTTPS using cloudflared.
I’m not even going to attempt to recreate the wheel here. If you want to do this, go read and follow along with Scott’s article. It can better articulate than I can how to do this. It’s really good.
Results
When I made the first manual change on my laptop to verify everything was working properly, I didn’t notice a whole lot of change at first. I already run an adblocker in my browser anyway after all, so what else could possibly be affected?
Well, as it turns out, quite a lot.
As I clicked through my bookmarks to make sure everything was working as anticipated, I noticed that Security Week suddenly had a lot of extra white space. And when reading through my social media feeds I realized that several links didn’t work correctly — I was getting back DNS resolution errors. The URLs were being redirected and Pi-Hole had blocked the request along the way.
The real test came when I changed the DNS server settings on my Ubiquiti USG-PRO-4 appliance to use the Pi-Hole as its DNS server. I didn’t warn my wife about this and waited to hear complaints about something not working, but nothing came. She continued to enjoy ignoring her Korean melodramas served from questionable websites while playing her ad-centric mobile games even as Pi-Hole blocked requests left and right.
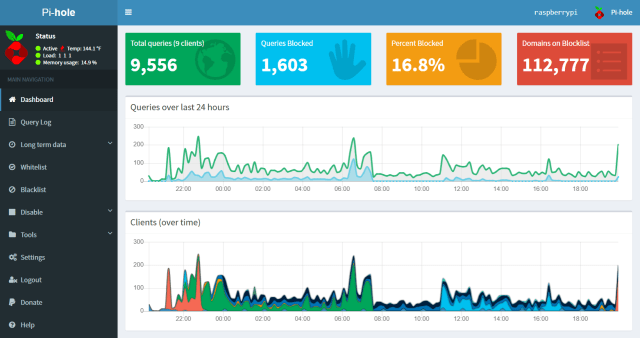
After 24 hours of runtime, I grabbed the screenshot above showing 1,603 queries blocked. It turns out that isn’t that many, either. Today — at this very moment — Pi-Hole is showing 14,173 blocked requests in the past 24 hours. I’m not sure what my wife has been doing all day while I’ve been at work but I have questions.
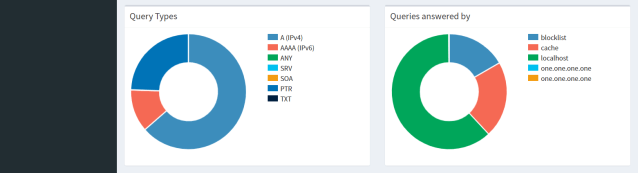
And also data!
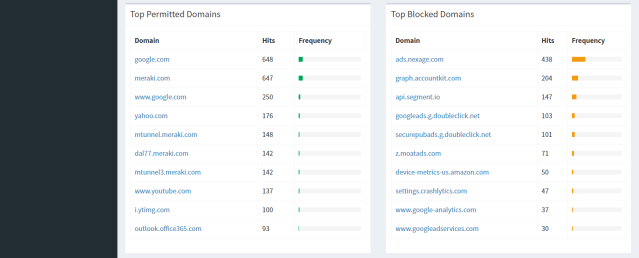
Because not only does Pi-Hole give you these high-level statistics, but it will also serve up details to you about uery types, top domains being blocked, statistics per client, and a full log of all queries it has seen.

Conclusions
In short, my feeling is this: I love my Pi-Hole. This was a quick, simple project which gave me more visibility to my overall network traffic than I had before. Sure, in a perfect scenario I would have established some sort of netflow monitor and syslog server on my network as a lab project, but I’m not quite there yet.
10/10 would recommend.
Long term, I would like to take the 24-hour log history that Pi-Hole will export and give the domains a once-over myself. Pi-Hole has a blacklist of — as of this writing — 112k domains, which I’m sure are maintained by people with far more experience than myself; however, I feel like this would be a good first step into network traffic analysis.
